
How Students Claim the Voiskey Student Offer
Install, sign in with a campus address, enter the code, and test dictation.
 Voiskey Team
Before You Claim: Check Eligibility and Devices
This guide explains How Students Claim the Voiskey Student Offer in the order that prevents rework: install the app, sign in with the email address your school issued, then enter the code that arrives at that address. Each step depends on the one before it, so an early miss costs a second attempt later. Set aside fifteen minutes at a desk with your laptop, your campus mailbox open, and one document you can safely use as a test page. Read the full path once before you touch the installer. Students who skim the sequence usually stall at sign-in because they used a personal address that cannot receive the code.
Confirm two things before anything else: that you have an active school address and that you can open its inbox on the laptop you plan to use. A school address you never activated will not deliver the code, and a forwarded copy may land somewhere you do not expect. Write down the exact form of the address, including any middle initials or year suffixes, because one wrong character sends the code to nowhere. If your department issues more than one alias, ask the front office which one is tied to your enrollment record. Five minutes of checking here saves a support ticket later.
Prepare the laptop itself, not just the account. Install pending system updates, confirm the built-in microphone picks up your voice in a short test note, and close anything that might grab the keyboard during setup. Clear a few gigabytes of disk space so the installer does not fail halfway. Set the screen to a comfortable brightness and put your notes in a window you can see while you speak. If you share the laptop with a family member, create your own account so your sign-in and your saved preferences stay separate. A calm computer and a working microphone decide whether setup takes ten minutes or an hour.
Finally, choose the test document and a baseline sentence. Open a scratch file, type one ordinary paragraph from your course reading, and time it. That number becomes your comparison point later, when you check whether speaking is faster than typing for the same material. Keep the file plain, with no formatting that could hide what the app inserts. Decide now where your real notes will live for the term, so the first dictation goes somewhere useful rather than into a lost scratch file. Leave the scratch file open and the address ready. The claim itself is short; the preparation is what makes the first session feel ordinary.
Install and Sign In in the Right Order
Start with the installer while the browser is otherwise quiet. Close the extra tabs, keep the official installer page visible, and run the package only from that site. Follow the prompts at their default settings unless your department has a written reason to change them, because a custom location is one more variable when something fails. After the install finishes, restart the laptop before the first launch; a restart settles the parts that were mid-update. Then give the first launch a full minute before you click anything. Open the app once and leave it running in the background. If you cannot see where it went, check the menu bar area or the system tray before assuming the install failed.
Sign in with the campus address you confirmed, not with a personal account you use for shopping. Type the address slowly and check it against the spelling you wrote down. If the app offers a choice between a password sign-in and a sign-in through your school login page, pick the one your campus IT page documents. Take a screenshot of any error rather than retyping blindly. Once you are signed in, stay on the account screen for a moment and confirm that the address shown matches yours. A mismatch here is the most common reason a code later appears to vanish. Say the address back to yourself before you continue.
With the account in place, open the app's main window and look for the status that tells you dictation is ready. Then open your scratch document, click where the cursor should sit, and press the shortcut once. Say a short sentence and watch where the text lands. If nothing appears, the usual causes are that the app is not running, that the field is not editable, or that the wrong window has focus. Test again in a second, simple field before you change any settings. Two working fields tell you the install is sound and the problem, if one exists, belongs to the first document.
Write down the three facts you will need later: the address you signed in with, the version shown in the app's about panel, and the shortcut you pressed. Keep them in the same notes file as your term plan. If the laptop belongs to the school and is wiped between terms, ask the lab staff whether the app can be reinstalled after a reset before you rely on it for a final project. Once the three facts are recorded, close the scratch file and move to the code step. A short written record removes most of the guesswork from any later conversation with support.
Enter the Code and Run a First Check
Request the code from the account screen and then watch the inbox for the campus address. Codes often arrive within a minute, but a slow mail route can add several. If nothing appears, refresh the inbox, check the other folders your school uses for filtered mail, and confirm that you are looking at the right account in a browser where you are signed in. Do not request five codes in a row; the newest one may invalidate the earlier ones and leave you guessing which is current. Keep the mailbox open in a second tab so you can see new mail arrive. Enter the code you received most recently, in one pass, and submit.
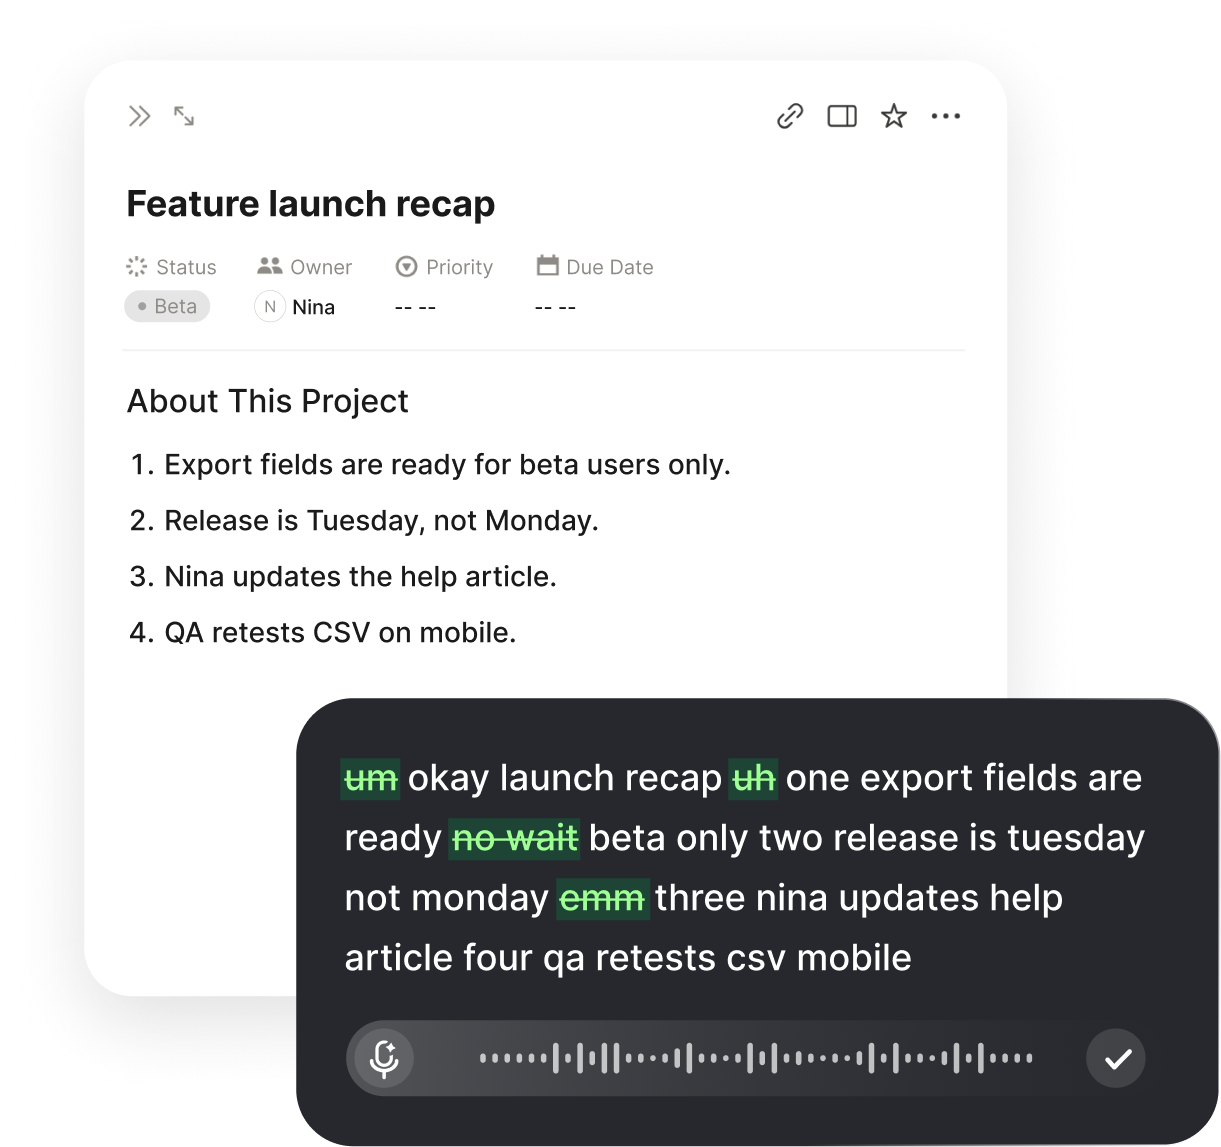
The first real check is not whether text appears but whether the text is usable. Press the shortcut in your scratch file and speak a sentence with a deliberate stumble, a repeated phrase, and a small correction. Read what arrives. The app should remove the stumble, keep the correction, and punctuate the sentence in a way that fits a note rather than a formal letter. Then speak a list of three items and see whether the formatting follows the shape of a list. Speak slowly enough that each item becomes its own line. These two tests tell you more about daily use than a single perfect sentence.
Repeat the check in the two places you will actually work: your note app and the field where you write to tutors. Type nothing; speak a two-sentence observation in each. Notice whether capitalization at the start of the sentence is handled, whether course names survive, and whether the cursor stays where you left it. If a name comes back mangled, say the name once more in a full sentence, because the app learns spelling preferences from use. Note the difference between the two fields in your scratch file. That note is your reference when a future update changes behavior. Keep it in the same file so it is one search away.
If the code fails, do not start over from the beginning. Check the address character by character, request one new code, and enter it within the window the screen states. If the screen offers no guidance, use the support route listed in the app rather than a search result. Record what you tried and the exact message you saw, because a precise description shortens any follow-up. When the code works, mark the date next to your three setup facts. A working entry plus a written record is the real end of the claim, not the moment the welcome screen appears.
Use It in Your First Week of Coursework
Put the app to work on the task that hurts most: getting notes down while a lecture keeps moving. Open your lecture file, place the cursor under the date heading, and speak the summary in your own words during natural pauses. Voiskey keeps up at up to 220 words per minute, so a summary that would take four minutes to type can land in under one. Speak in complete sentences and let the app remove the false starts. Your job is to decide what matters; the typing is no longer the bottleneck. Speak at your normal pace, because slowing down to dictate defeats the point. At the end of the hour, you should have a file you can read, not a page of fragments.
Use the same habit for reading. After each section of a chapter, close the book for a moment and speak what the section argued, what evidence it used, and what you still doubt. Dictate into the reading log you already keep, with the page range at the top. Because the app adapts punctuation and tone to what you are doing, a summary spoken for your own eyes reads tighter than a message spoken for a tutor. If a section is dense, say two shorter summaries rather than one long one. When a term gets busy, this small loop is the difference between a reading log that exists and one you meant to write.
Email and messages are the second place to practice. Compose in the field where you already type, with no copy-paste, and speak the message in the tone the recipient expects. A request to a lecturer should sound like a request, not like a transcript of your thinking. Say the greeting, the one-sentence ask, the context, and the closing, then edit the result in place. Students often discover that speaking forces them to decide what they actually want before they write. Do this twice a week for a fortnight and the habit will attach itself to the task. Read the sent message once before you close the window.
One download covers the whole system, so the same shortcut works in your note app, your mail, your browser, and the field where you submit coursework. Keep the app running from login, and treat the shortcut as a normal part of your keyboard. At the end of the first week, count how many tasks you completed by voice and which ones you still typed. Voiskey is a tool for the tasks where speaking beats typing, not a rule that forbids the keyboard. Write the count in your term plan and pick one more task to move next week. Small moves are easier to keep than a complete switch.
Keep the Setup Working Through the Term
Set a monthly ten-minute check. Confirm that Voiskey still launches after system updates, that the shortcut responds in two different apps, and that the name you added last month still comes back correctly. Updates are the usual reason a working setup suddenly feels wrong, and the fix is often a restart or a fresh sign-in rather than a settings change. If you change laptops, download the installer again from the official page and sign in with the same campus address, then re-enter the code sent to it. Keep your three setup facts in the term plan so this takes minutes.
Build a small vocabulary file as the term goes on. Every time a lecturer uses an acronym, a theorist's name, or a spelling your department prefers, say it once in a full sentence in your notes. Voiskey learns names, jargon, acronyms, and spelling preferences from that use, and the payoff compounds across a semester of the same course. Do not wait for a perfect list; grow it from the errors you actually see. At midterm, read the list aloud once so the pronunciations are fresh in your mind as well as the app's. Add every new course code as soon as you meet it.
Review which tasks are still typed and why. Some, like equations or code, belong on the keyboard. Others, like reading responses or lab reflections, only feel like keyboard tasks because you have always done them that way. Move one per fortnight and measure the minutes. If a task gets slower, move it back without guilt; the goal is a working split, not purity. Record the split in the term plan so a future you, or a classmate who asks, can see what actually worked. Voiskey should earn its place in your week. The split you record is the honest measure, not the number of shortcuts you know.
At the end of the term, keep the setup rather than deleting it. Sign out on shared laptops, note the version you finished on, and archive your vocabulary list with your course files. If you take a break from study and return next term, download the current installer, sign in with the same address, and run the two-field check before the first lecture. The claim, the code, and the first week are a single project; the maintenance is what turns them into a habit. Students who plan the check as part of registration week rarely lose a session to setup.
FAQ s
Eligibility is tied to the address you sign in with. Install Voiskey for the two desktop systems it supports, sign in with the email address your campus issued, then enter the code sent to that address. The code shows you can open the campus mailbox, so keep that inbox reachable during setup.
Install the app, sign in with your campus address, and enter the code sent to that address. Then open any text field, press the shortcut, and speak. Text lands at the insertion point, with filler words and stutters removed and punctuation fitted to the task. Check two different fields before you trust the setup.
Yes. Install the app on the second system, sign in with the same campus address, and enter the code delivered to that mailbox. Run the shortcut test in two fields to confirm the insertion point behaves the same way. Keep your vocabulary of course names and acronyms with your notes so the new setup starts close to where the old one ended.
Confirm the address on the sign-in screen matches the campus address exactly, including initials and year suffixes. Refresh the mailbox and look in the folders your campus uses for filtered mail. Request a single new code rather than several, then enter the most recent one. If it still fails, use the support route inside the app and describe the exact message you saw.


 Voiskey
Your voice, amplified.
Download Voiskey for Mac and Windows and turn lecture speech into clean notes in minutes.
Use it across macOS, Windows, iOS, and Android